You are using an unsupported browser. Please update your browser to the latest version on or before July 31, 2020.
close
You are viewing the article in preview mode. It is not live at the moment.
Home > Training Guides (English) > Create Requisitions from Smart Form or Local Catalog
Create Requisitions from Smart Form or Local Catalog
print icon

          Create Requisitions from Smart Form or Local Catalog


From the Navigator, under Procurement, click ‘Purchase Requisitions.’


Click on ‘Edit’ pencil located next to Requester name.


If you switch between BUs, always verify the BU before creating any requisition. In this example, the requisition is for RAC US. Select ‘Save and Close’.


​​


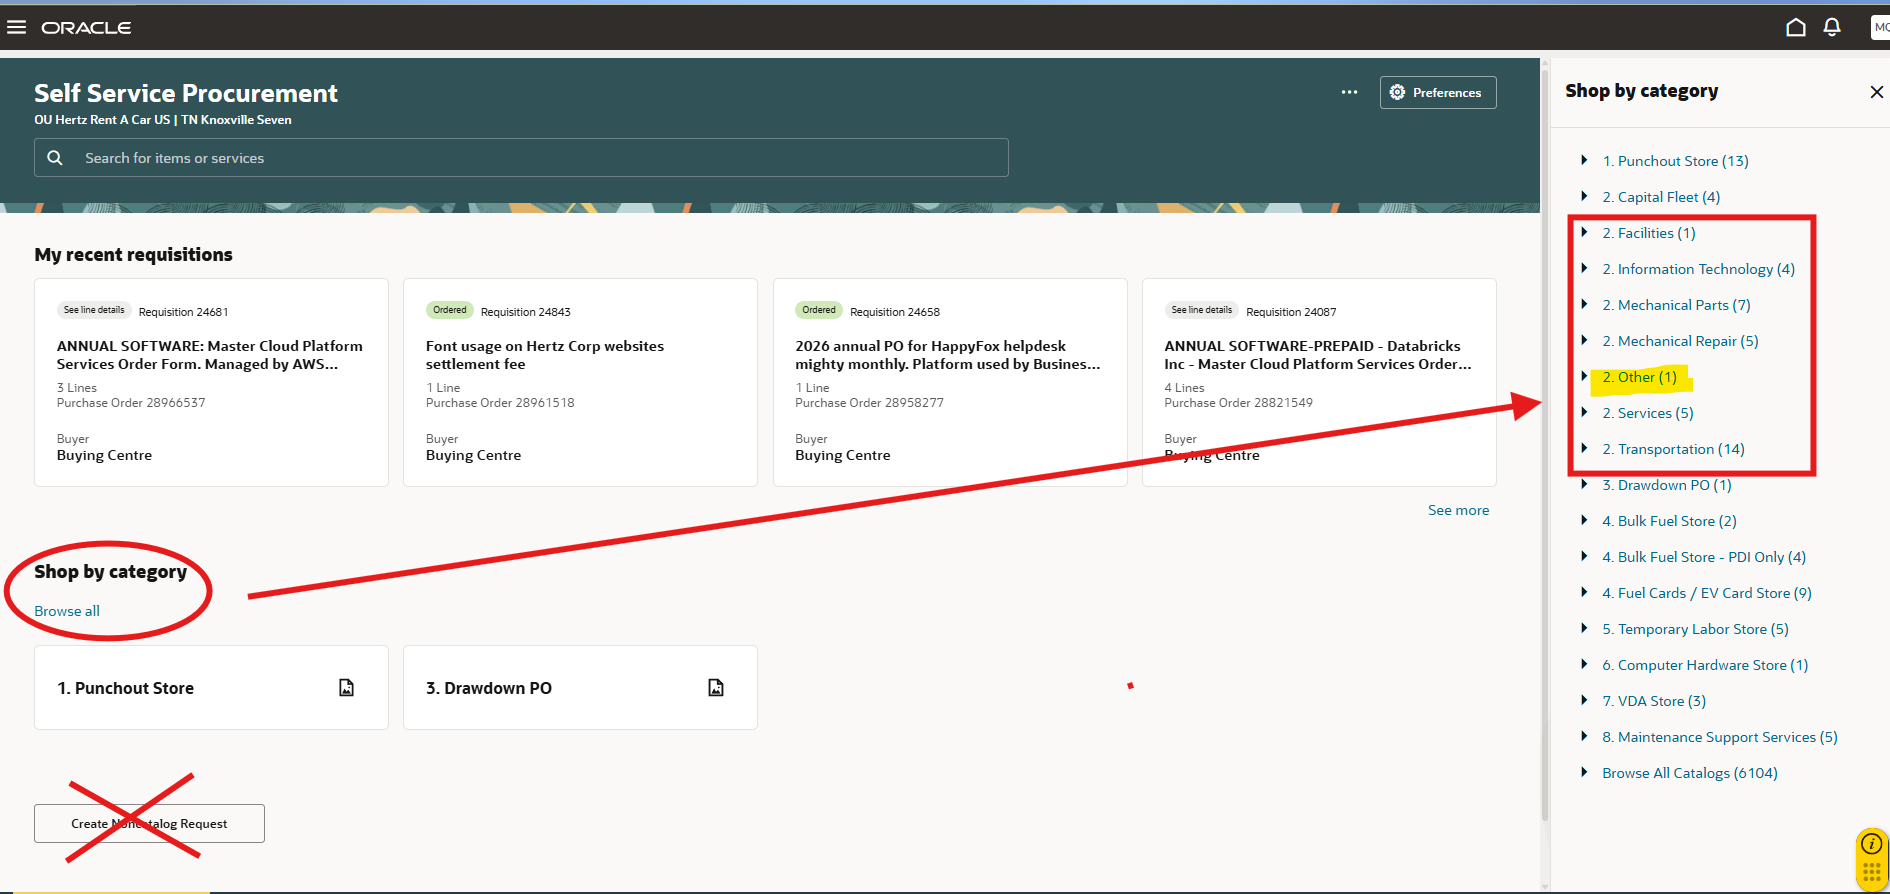
Select ‘Shop by Category’ to open a list of categories

Smart Forms are denoted by the number 2, these requisition request forms are preset  with a specific PO category, the item description, amount (expected monetary spend) and supplier, supplier site are all editable.

The Smart Form located in the 'Other’ category is called a multipurpose creation form, this does not have specific PO category,  All fields are editable this form replaces the Non-Catalog requisition for North America.


Select the category required for PO and complete the Smart Form. The item description is editable if more details are need you can add this field.


To add attachments, select the plus sign and upload the document

Once completed select ‘Add to Cart’, select the Cart icon and always select review to complete the requisition creation process.


Below example of a requisition created by a predetermined PO Category: FLEETMNT.PARTS.TIRES.TIRE FITTING


To add more than one line, go back to shop by category, select the correct form, complete the * designated boxes, update the description if need and add to cart.


Below example is a requisition created by using Multipurpose Creation Form.

Add the item description, the PO category field is blank, the requisition preparer will need to add the correct PO category.

If you are unsure of the PO category see the list, on our SharePoint site: PO Category Listing.

Add the supplier’s name, select the supplier site, there may be several, choose the site where the supplier will invoice from.

Select ADD to Cart, hover on the Cart icon, select Review, never submit as you need to add/review more information.


Below example of item(s) in the cart for final update and submission

Make any updates to description, add justification (if needed), update the requester name (if required).

ALWAYS update the requested delivery date, the 2-day default is too short of delivery window.  

This date is part of the PO close review, you do not want your PO being closed too early.

The date you select should be based on the date you expect the item(s) to arrive or when the service/work is performed/completed.


Update location if different than requester name and/or modify the charge account segments. This is very important if your requester name location is not the same as the requisition BU region location,


If more than one line exists, each line will need to updated. Manually select each line or highlight all lines, select the Edit Multiple Lines box, update the details in the pop out line box, select OK This will copy all the information to all lines.

See how to guide for step-by -tep instructions: Multi Line Requisition Guide if you need more assistance 


The charge account will automatically populate based on the BU, requester name and PO category, if you need to make a change, it can be manually updated. This should only be done based on direction from Finance. Never update the Natural or Sub account, update the PO category instead.

Save and Submit.  Once approved Oracle will automatically create a PO


*** If you would like the word document version of this guide, look to the right side under attachments to download a copy. ***

Feedback
6 out of 8 found this helpful

Attachments

Create_Requisitions_from_Smart_Form_or_Local_Catalog.docx
scroll to top icon